How do I set up my workout journal?
Short answer
Journal setup in SmartWorkout is a guide through your workout settings that shows each option on a sample workout. In it you set the Simple or Detailed view, rest, RIR or RPE, tempo and the weight step of the +/− buttons. Open it from the Workout tab or in Profile › Settings › Workout Settings.
Where to start journal setup
You can start journal setup from the Workout tab or from your workout settings. Each step changes the journal setting right away, and you see its effect on a sample workout above the question. In the Simple view the setup has 13-16 steps, in the Detailed view 18-21, depending on your answers.
- On the Workout tab: the "Configure your workout journal" card with the "Configure now" button. The card stays until you finish the setup or close it.
- In Profile › Settings › Workout Settings: the "Configure your journal step by step" card with the "Configure now" button, and after the setup the "Go through the setup again" row.
- On the first step, "Set this up later" closes the setup. If you close the app halfway, the setup returns to the same step the next time you open it.
Simple or Detailed view
The first step of the setup is choosing the journal view: "Simple" or "Detailed". Both views save the same data. Simple shows one exercise at a time in a larger layout, and Detailed fits more on one screen with smaller previews.
The screenshots show the same workout, Hyper V4 2026 - A1. In the Simple view (left) you open one exercise from the list, here the Barbell Bench Press, with a large illustration, a tip, rest, tempo and the sets, which you check off once done. In the Detailed view (right) all exercises are on one list: next to each set, the result from the previous workout in a column headed with its date ("26 OCT"), the weight and reps fields with a suggestion, and in the last column the e1RM, which appears once you enter the set.
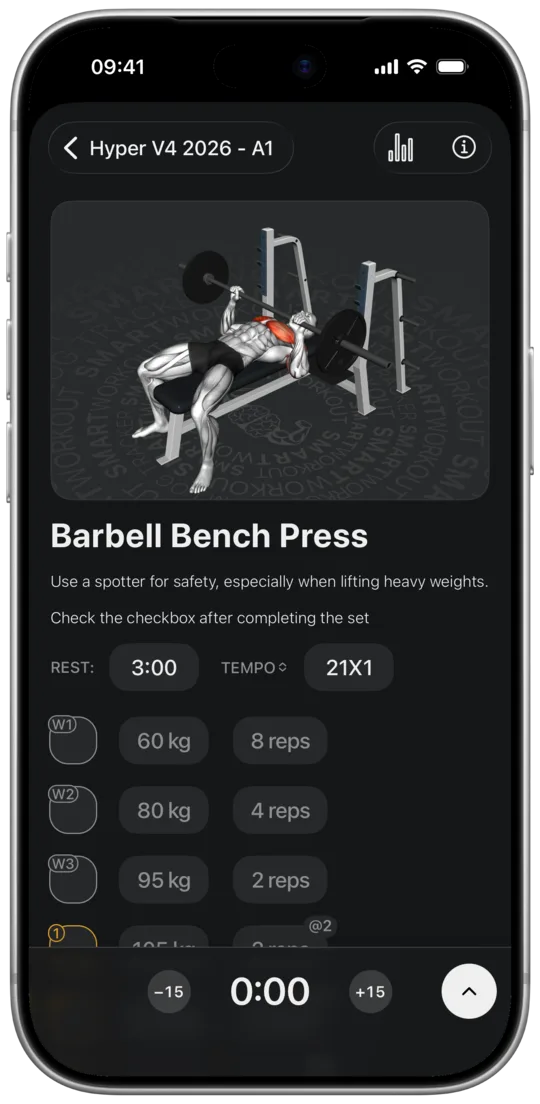
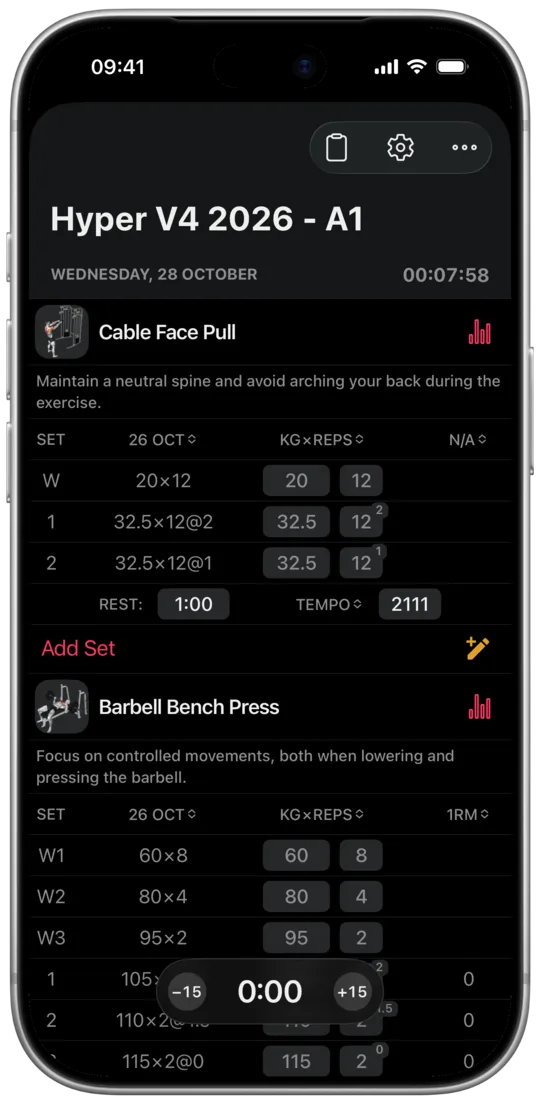
- In the Detailed view the setup has 5 extra steps: auto-approving sets, starting and extending rest, and tempo.
- "Exercise Tips": tips show up in the journal, and tapping a tip shows the next one.
- "Exercise Preview": an illustration of each exercise in the journal.
- You can change the view later in Workout Settings under "Log View", or during a workout: the ⋯ menu at the top of the screen › "Switch view".
Rest between sets
The "Rest time" step sets whether you set the rest between sets once for all sets of an exercise ("Per exercise") or separately for each set ("Per set"). A separate time helps, for example, after a warm-up set, when one minute is enough instead of 3.
- In the Detailed view, the "Auto-approve sets" step decides how rest starts. On: a set is approved once you enter weight and reps and hide the keyboard or move to the next set, and the countdown starts right away.
- Off: you check a set off once you've done it, and the countdown starts then. A set with no results entered is saved with the suggested values.
- In the Detailed view, the + button on the rest timer adds 15 s to the rest, even after the time is up, and − takes 15 s off. The countdown doesn't restart.
RIR or RPE in the journal
The effort step asks: "Do you track how many reps you have left in reserve?". That's a question about RIR, reps in reserve, and the next steps depend on your answer.
- "Yes": you choose the scale, "RIR (recommended)" or "RPE". RPE 8 is roughly RIR 2.
- "No": the setup explains why it's worth logging reps in reserve and sets RIR.
- "I’m not sure what that means": three steps with an explanation. The same 100 kg × 8 set can leave 2 reps in reserve or none, and RIR describes that difference. Then the setup sets RIR.
- Finally you choose whether RIR or RPE gets its own field. On: after the reps the journal moves to the RIR/RPE field and hides the scale on the keyboard. Off: you pick the value on the keyboard together with the reps.
Tempo in the Detailed view
You set tempo in the setup only in the Detailed view. The question is: "Do you pay attention to the tempo of your reps?".
- "Yes": you decide whether tempo should show in the journal. Tempo belongs to the exercise, not to the set.
- "No" or "I’m not sure what that means": a step with an example of tempo 31X0, that is 3 s lowering, a 1 s pause, an explosive lift and no pause at the top. Then you choose "I want to use tempo" or "Hide tempo".
- This step has a "Skip" button at the top.
Weight step of the +/− buttons
Three steps set how much the +/− buttons on the keyboard change the weight: separately for barbells, for dumbbells, and for machines and other loads. The slider changes the step in 0.25 kg increments, up to 5 kg for barbells and machines and up to 2.5 kg for dumbbells.
- With a 2.5 kg step, one tap on + changes 60 kg to 62.5 kg.
- This step only applies to the +/− buttons. Progression suggestions (Premium) pick the weight step themselves.
- These steps also have a "Skip" button at the top.
Progression suggestions and volume zones (Premium)
Two steps of the setup are about Premium features: progression suggestions and volume zones. For each you choose "No, thanks" or "Learn More", and the explanations add up to 10 steps.
- Progression suggestions: 5 steps on how they work, for example that with a 6-8 range reps go up first and the weight goes up after 8. At the end, with Premium you turn them on with "Yes", and without Premium "Try progression suggestions" opens the purchase screen.
- Volume zones: 4 steps on the four ranges of weekly sets per muscle group, the week view, the table and the volume bar in the journal. "Try optimal volume" turns them on with Premium, and without Premium opens the purchase screen.
- With Premium, saying no turns that feature off. Without Premium, saying no turns nothing off, so after buying the feature works right away.
What the setup doesn't cover
Journal setup doesn't cover supersets and other exercise groups or set types, such as drop sets. You set those on the exercises during a workout, in a template or in a plan.
- The last step, "Your journal is ready!", reminds you that you can change every option later in Workout Settings or by going through the setup again.
- Other journal options, such as "Keep screen on" or "Timer sound", are only in Workout Settings.